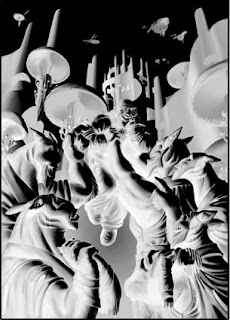
sin más pasamos a la realización de esta ilustración llamada " Adorable Alien".
Today we have with us Michael Dashow. This concept illustrator and has done numerous illustrations for books such recognition within the world of digital illustration, Spectrum "Exposé", Imagine FX, Art and Fantasy Art Magazine Magazine. He is currently a designer of environments for Microsoft Game Studios and creatures for Square / Enix game.
Without further turn to the realization of this illustration called "Adorable Alien."
Paso 1.
Empiezo con el dibujo a lápiz, trazando la escena y escaneándola en Photoshop.
" I start with line art, tracing vellum and scanned in photohop."

Paso 2.
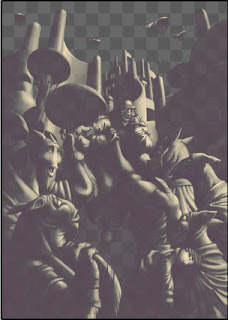
Con la línea del dibujo en una capa superior (multiplicar) , pinto todo en escala de grises. Esto no es un valor con texturas 3D renderizadas.
"With the line art on a top layer set to multiply, i paint everything in grey-scale. This isn´t value a 3d render with textures. "

Paso 3.
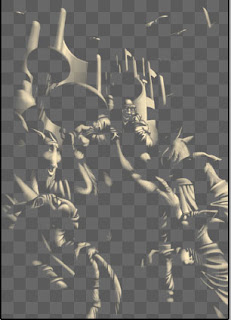
En una capa aparte , pinto una segunda fuente de luz a la izquierda, pinto en la parte superior de la escala de grises, pero aquí estoy mostrando la capa tal como es.
" on a separate layer, i paint a second ligth source from the left, i paint it on top of the grey scale, but here i´m just showing the layer by itself."

Paso 4.
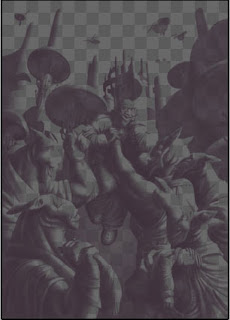
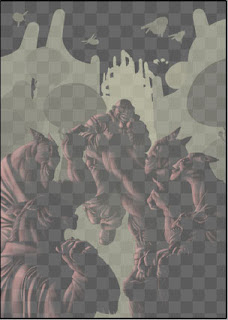
Seguidamente pinto el fondo para darle profundidad sobre una capa separada, para las regiones más profundas , colores más opacos que los que están en primer plano.
" i also paint a depth map on a separate layer, with the deeper regions futher back more opaque than those up front."

Paso 5.
Esto es lo que aparece que mientras estoy trabajando, con todas las capas visibles en una.
" this is what it looks like while i´m working, with all of those layers all visible at one."

Paso 6.
Para generar el color en las sombras y luces, empiezo en la con la capa en escala de grises, hago dos copias del canal ROJO para modificarlo.
" to generate colored shadows and hilighting, i start with my lighting pass grey scale image. i make 2 copies of the red channel to alter. "

Paso 7.
Ajusto los niveles de uno de los canales para conseguir esto : una de selección de canal para las luces en la escena. Con los canales , las zonas blancas son seleccionadas como áreas.
" i justed the levels of one channel to get this: a selection channel for the hilights in the scene with channels, the white areas are the selected areas."

Paso 8.
con el otro canal lo ajusto para a destacar las zonas más oscuras. Seguidamente lo invierto, de forma que cuando se utiliza como una selección, las sombras serán lo que será seleccionado.
" with the other channel, i adjust it to emphasize darkest areas. i invert it so that when used as a selection, the shadows will be what are selected."
Paso 9.
He creado una nueva capa de llamada "Luces", traslado la selección del canal y relleno con un color amarillo pálido. Este canal se establece en "Overlay" (superposición).
" i created a new layer calles "hilights", load the hilight selection channel and fill with a pale yellow. this channel is set to overlay"
Paso 10.
Creo una nueva capa llamada "Sombras", traslado la selección del canal y las sombras se llenan de un púrpura oscuro y ajusto la capa en modo "Multiply" (multiplicar).
"i make another new layer called "shadows", load the shadows selection and fill with a muted purple and set to "multiply"."
Paso 11.
Aquí están los colores base de la escena. Esto es realmente una docena de capas con cada uno de los los coloeres separados por capas.
" here are my diffuse colors for the scene. this is actually a dozen layers with each block of color in a separate layer."
Paso 12.
" with the other channel, i adjust it to emphasize darkest areas. i invert it so that when used as a selection, the shadows will be what are selected."

Paso 9.
He creado una nueva capa de llamada "Luces", traslado la selección del canal y relleno con un color amarillo pálido. Este canal se establece en "Overlay" (superposición).
" i created a new layer calles "hilights", load the hilight selection channel and fill with a pale yellow. this channel is set to overlay"

Paso 10.
Creo una nueva capa llamada "Sombras", traslado la selección del canal y las sombras se llenan de un púrpura oscuro y ajusto la capa en modo "Multiply" (multiplicar).
"i make another new layer called "shadows", load the shadows selection and fill with a muted purple and set to "multiply"."

Paso 11.
Aquí están los colores base de la escena. Esto es realmente una docena de capas con cada uno de los los coloeres separados por capas.
" here are my diffuse colors for the scene. this is actually a dozen layers with each block of color in a separate layer."

Paso 12.
Aquí están mis capas de sombras y luces que iran encima de las capas de color.
" here are my hilight and shadows layers from above which will go over the colored-in layers."
Paso 13.
Sin duda una gran ilustrador y mejor persona. ¡¡¡¡ Gracias Michael.!!!!
Podeis ver sus trabajos AQUI
Greatly thank the author for his great contribution to this blog.
Undoubtedly great illustrator and a better person. ¡¡¡¡Thanks Michael .!!!!
You can see his work HERE
" here are my hilight and shadows layers from above which will go over the colored-in layers."

Paso 13.
Y no olvidar el lado de luz y las capas de fondo. Aquí están con los colores finales que escogí para ellos.
" and don´t forget the side-light and depth layers, here with the final colors i chose for them."
Paso 14.
Agradecer enormemente al autor por su gran aporte a este blog ." and don´t forget the side-light and depth layers, here with the final colors i chose for them."

Paso 14.
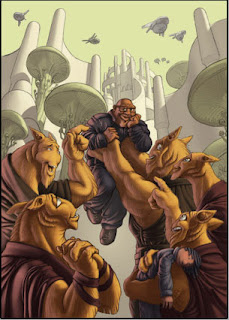
Lo ponemos todo juntos y usted consiguimos esto ( ¡ o al menos lo hacemos después de horas de evolución de cada capa de color para obtener algo agradable!).
" put them all together and you get this (or at least you do after hours of changing every layer´s color to get something pleasing!)"
Paso 15.
 .
.

¡¡¡¡¡ HECHO!!!!!
" put them all together and you get this (or at least you do after hours of changing every layer´s color to get something pleasing!)"

Paso 15.
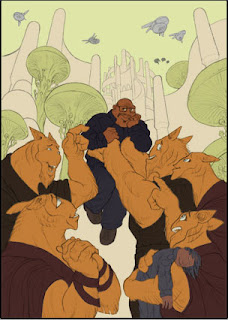
Y, a continuación, añadir algunos ajustes al los colores de la piel , gradientes del color en la parte superior e inferior) , y empiezo a detallar
" and then i add some adjustments to the fur colors, gradients set to "color" on the top and bottom, and i´m on my way!!"
" and then i add some adjustments to the fur colors, gradients set to "color" on the top and bottom, and i´m on my way!!"
 .
..
.
.

¡¡¡¡¡ HECHO!!!!!
Sin duda una gran ilustrador y mejor persona. ¡¡¡¡ Gracias Michael.!!!!
Podeis ver sus trabajos AQUI
Greatly thank the author for his great contribution to this blog.
Undoubtedly great illustrator and a better person. ¡¡¡¡Thanks Michael .!!!!
You can see his work HERE
No hay comentarios:
Publicar un comentario